How to Print Your First Shipping Label in Under 5 Minutes: A Step-by-Step Guide
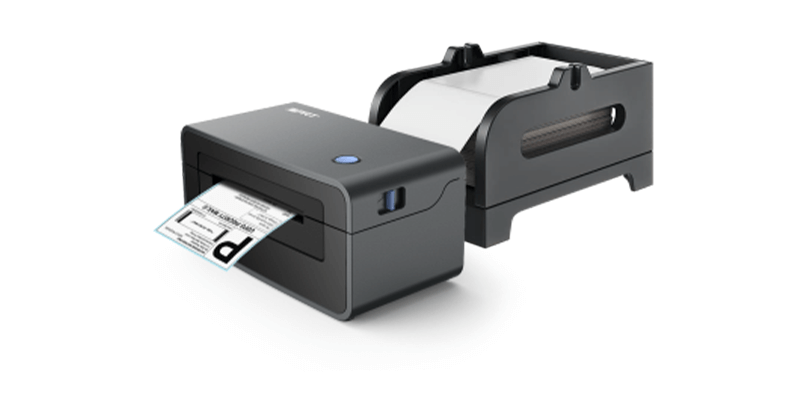
Setting up a shipping label printer and printing the first shipping label can be daunting for new sellers. This guide walks you through unboxing, installation, and printing your first 4×6 shipping label step by step. By the end, you’ll know how to print on eBay, USPS, UPS, PayPal, FedEx, Etsy, and Shopify with zero stress.
It walks you through unboxing, connecting cables, and loading labels step by step—so you can follow along visually before starting.
Step 1 — Connect Power & USB Cable
Plug in the power cord and connect the USB cable to your computer.
Step 2 — Load 4×6 Thermal Labels Correctly
Open the cover, insert the labels, adjust the guides, and close.
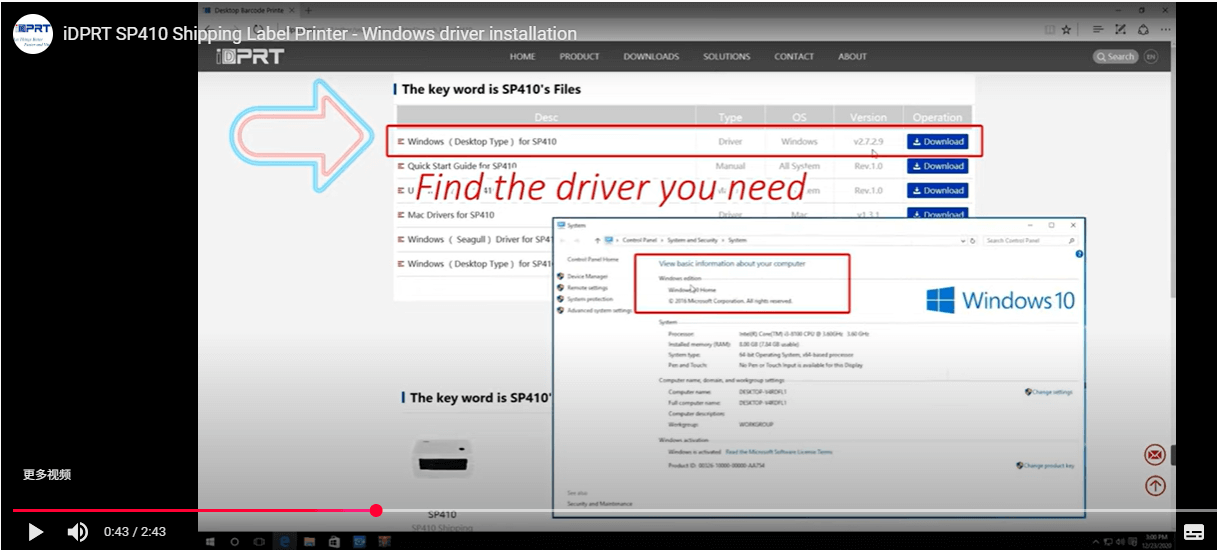
How to Install Printer Driver (Windows & Mac)
Install Windows Printer Driver for Shipping Labels
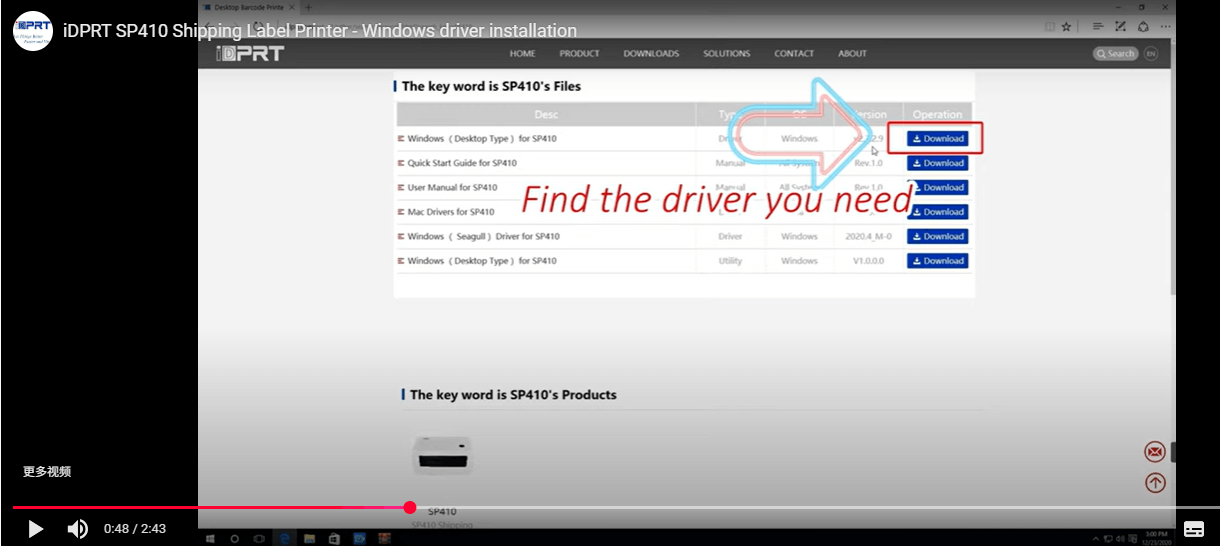
Step 1 — Find Your Driver:
Go to your printer manufacturer's official support or download page.
Step 2 — Download the Windows driver.
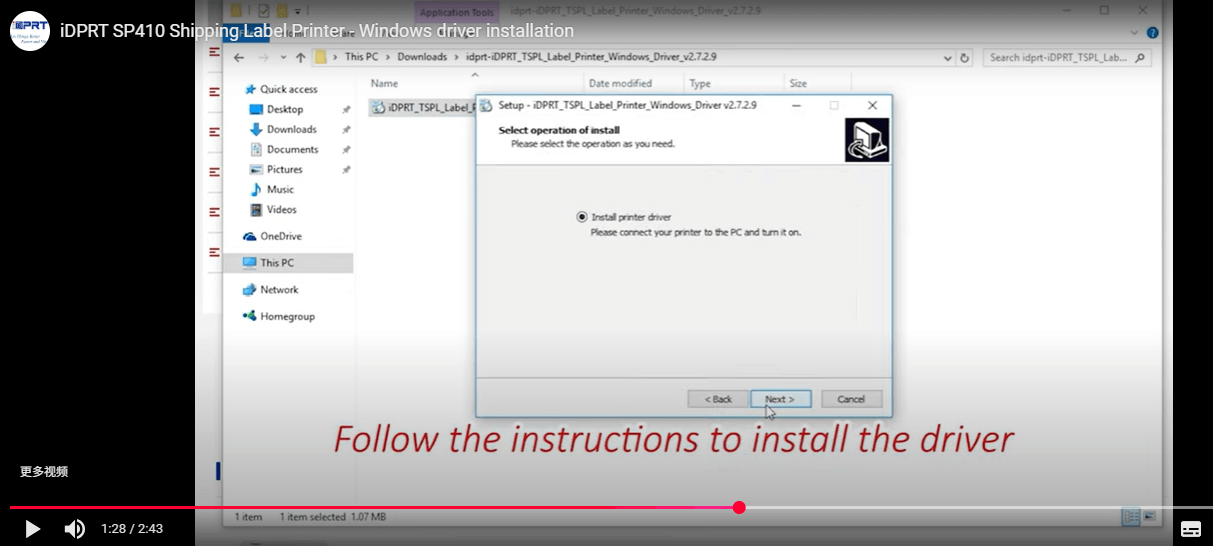
Step 3 — Run the installer, click Next a few times, and finish.
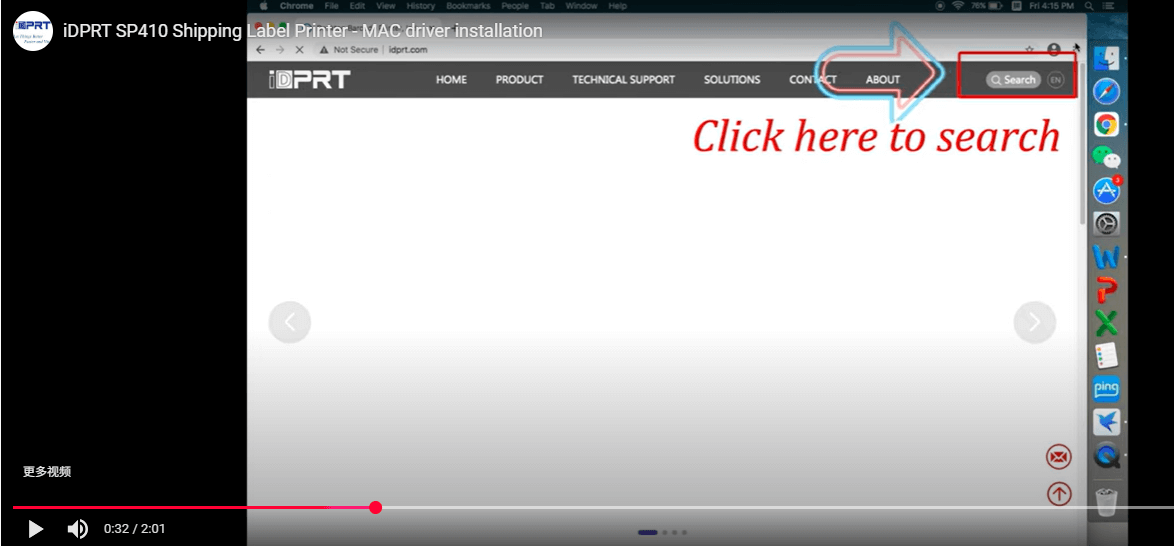
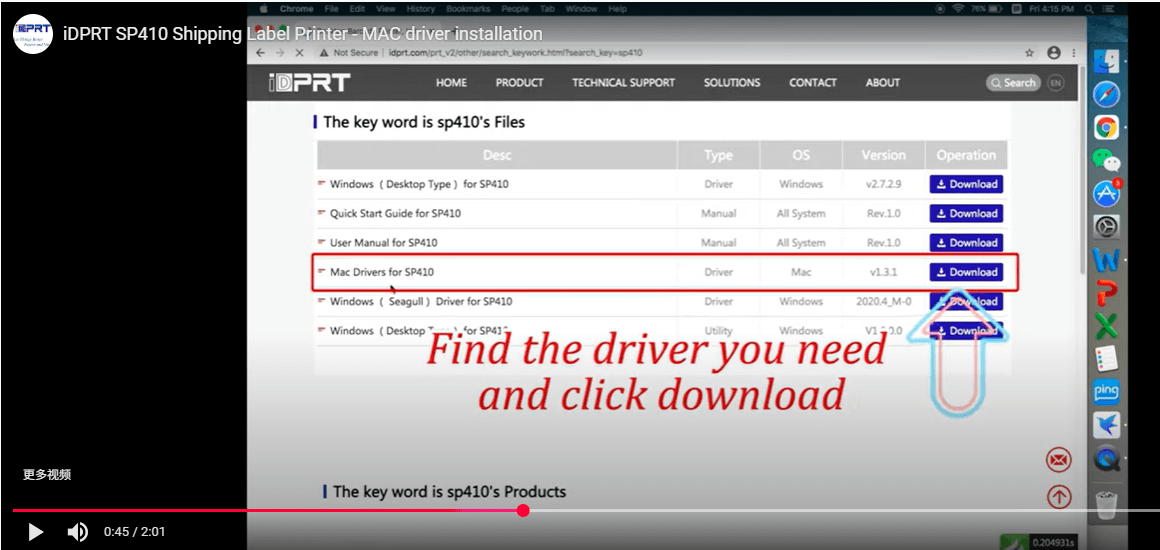
Install Mac Printer Driver for Shipping Labels
Step 1 — Find Your Driver:
Just like with Windows, navigate to your printer manufacturer's official support or download page.
Step 2 — Download the Mac driver.
Step 3 — Install on Mac:
Open the downloaded file. Mac installation can vary, but it's usually one of two simple methods:
Drag & Drop: You may be prompted to drag the printer's icon into your Applications folder. (This is how the SP410 driver installs.)
Installer Package (.pkg): Alternatively, you may need to double-click an installer package and follow the on-screen prompts, similar to the Windows process.
Configure 4×6 Shipping Label Printer Settings
Before you print, make sure your printer and computer are properly configured.
Preflight Checklist
Print a Perfect 4×6 Label on the First Try
1
Paper Size: 4×6 inches (Windows: Printer Preferences; Mac: Page Setup)
2
Scale: 100% (No "Fit to Page")
3
Margins: None | Orientation: Portrait
4
Headers/Footers: Off (browser print dialog)
5
Thermal Settings: Darkness 7–9 (adjust to label stock)
6
Calibrate: Run auto-calibration before your first batch
7
PDF sanity check: If a platform downloads multiple PDFs (labels + packing slips + customs forms), disable pop-up blockers so every document opens.
Want branded labels without a designer? Use the free Label Designer to create store-ready shipping and product labels.
Platform-Specific Guides to Print Shipping Labels
How to Print Shipping Labels on Shopify
1. Open Orders in Shopify.
2. Select an order → Create shipping label.
3. Choose Thermal (4×6); print labels, packing slips, and customs forms together or separately.
4. You can bulk-print up to 100 labels, and combine packing slips with labels on desktop formats (disable pop-up blockers so all PDFs open).
5. (Optional) You can also print from the Shopify mobile app.
How to Print a Shipping Label on eBay
1. Go to Seller Hub → Orders.
Log in to your eBay account and open Seller Hub. From the Orders tab, find the order you want to ship.
2. Select the Order → Print Shipping Label
Click on the order and choose Print shipping label to open the label creation page.
3. Choose the Label Format→4×6 inch thermal label
4. Confirm & Print
5. Review shipping service, postage, and Ship Date. After purchase, you can reprint the label as many times as needed until the Ship Date. If the date has passed, you must cancel/refund and repurchase the label.
Troubleshooting Tips:
If the PDF label looks distorted or misaligned, update your PDF reader (e.g., Adobe Acrobat) or try another browser.
Make sure your printer settings (paper size, scaling = 100%) match the label format you selected.
No printer? That's often time-consuming and inconvenient. Instead, use Label Broker® to generate a QR code and print at the Post Office—or choose Label Delivery Service to have the label mailed to you. You can also schedule free USPS pickups online. But keep in mind, that's still time-consuming and inconvenient—you need a professional shipping label printer to make your shipping easier and worry-free.
How to Print UPS Shipping Labels Quickly
1. Go to UPS.com → Ship → Create a Shipment.
2. Select Label Size: 4×6, download, and print on SP410.
Pro Tips:
No printer? You can generate a UPS Mobile Barcode in the UPS App and have it printed at The UPS Store—but that means extra steps, waiting in line, and lost time. A dedicated thermal shipping label printer like the SP410 lets you print instantly at home, making shipping faster and stress-free.
Thermal not printing? Install the UPS Thermal Printing app, allow pop-ups, and ensure your Java is current (UPS notes Java is required on UPS.com for thermal printing).
How to Print a Shipping Label on PayPal
1. From your PayPal dashboard, select an order and choose Print shipping label, or use the PayPal Shipping Center (ShipStation) to create and print.
2. Pick 4×6 thermal label.
You can create a Quick Label without an order, purchase insurance, download the PDF, print the packing slip, and even create multiple labels for multi-box shipments.
How to Print FedEx Shipping Labels (with or without a Printer)
1. Log into FedEx.com → Create a Shipment and generate your label.
2. With a printer: Choose 4×6 and print on SP410.
3. Without a printer: You can use the FedEx Mobile App to generate a QR code or email your label to a FedEx Office store. They can print it for you, but this usually means extra time and a small fee—less convenient compared to printing instantly with your own shipping label printer.
How to Print an Etsy Shipping Label in 4×6 Format
1. Go to Shop Manager → Orders and download your label.
2. Open the PDF and set the paper size to 4×6 if using the iDPRT SP410 thermal printer. Etsy officially supports USPS labels in 4×6 format, and the SP410 ensures your labels are printed clearly and remain fully scannable.
3. Attach the label cleanly;
4. If you're printing international documents, use the proper USPS 2976-E envelope when required. If a label needs changes after purchase, refund it and buy a new one.
Troubleshooting & FAQ: Quick Fixes for Common Issues
Q1: Why is my shipping label printing blank?
Labels may be loaded upside-down. Thermal paper prints on only one side.
Q2: How do I fix misaligned or skipped shipping labels?
Ensure paper size is 4×6 inches, scale at 100%, then run auto-calibration.
Q3: Can I print shipping labels directly from my phone?
The SP410 is USB-based. To print from mobile, use a computer or a mobile-to-USB adapter. (Shopify's mobile app can trigger label printing to a paired printer.)
Q4: Do I need Wi-Fi to print shipping labels?
No. As long as your printer is connected by USB, you can print from Shopify, eBay, Etsy, USPS, UPS, PayPal, or FedEx.
Q5: Where can I buy 4×6 thermal labels for my printer?
Get compatible 4×6 labels from office supply stores, or online marketplaces.
Q6: How do I clean a thermal printer head if the print is faded?
Use an alcohol wipe or cleaning card. Wipe gently, let dry, then resume printing.
Q7: Can I reprint a lost or damaged shipping label?
Yes. Shopify supports reprints from the Shipping labels page; eBay allows re-downloads until Ship Date (after that, refund + repurchase); PayPal lets you reprint from the Order Summary or Shipped screen.
You’re Officially a Shipping Pro!
See? We told you it was easy. From unboxing to printing your first professional 4×6 label,
you’ve mastered the setup and are now ready to save countless hours.
Welcome to the world of efficient, stress-free shipping!
What’s Next?
Ready to experience this simplicity for yourself?
Choose your iDPRT shipping label printer today
and say goodbye to shipping headaches forever.